January 2026 - Page 3 of 3 - All Cloud Hub

Viewing Files from Multiple Clouds in One Place

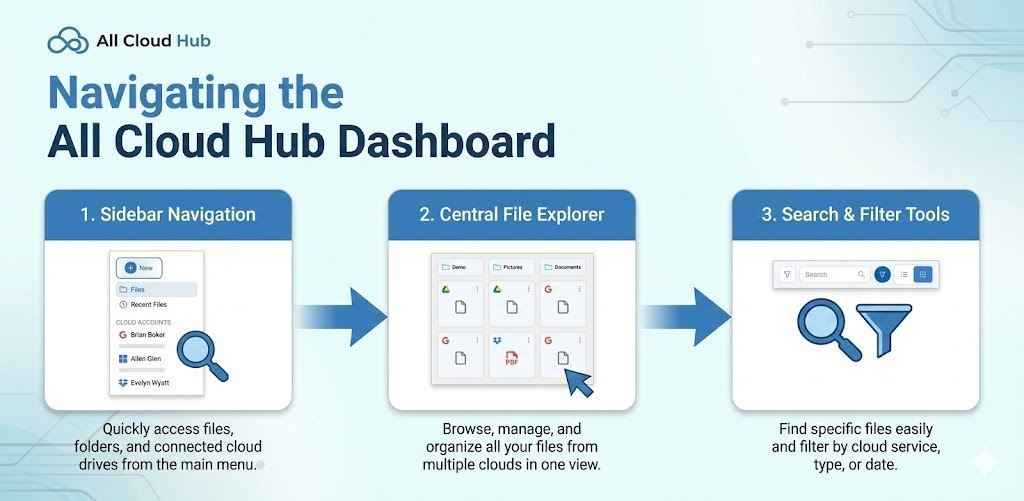
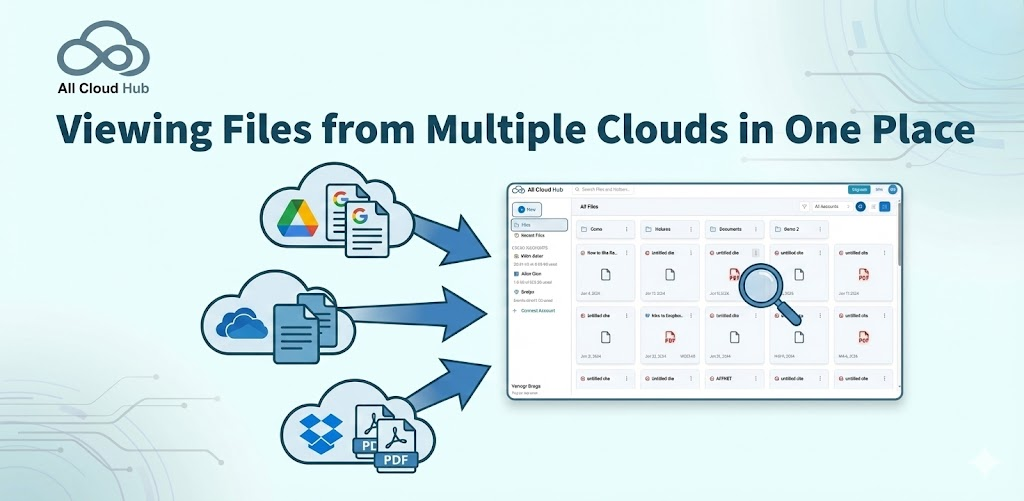
All Cloud Hub allows you to view files and folders from multiple connected cloud storage accounts together inside FilesVerse.

This unified view helps you work across cloud services without switching between individual cloud apps.
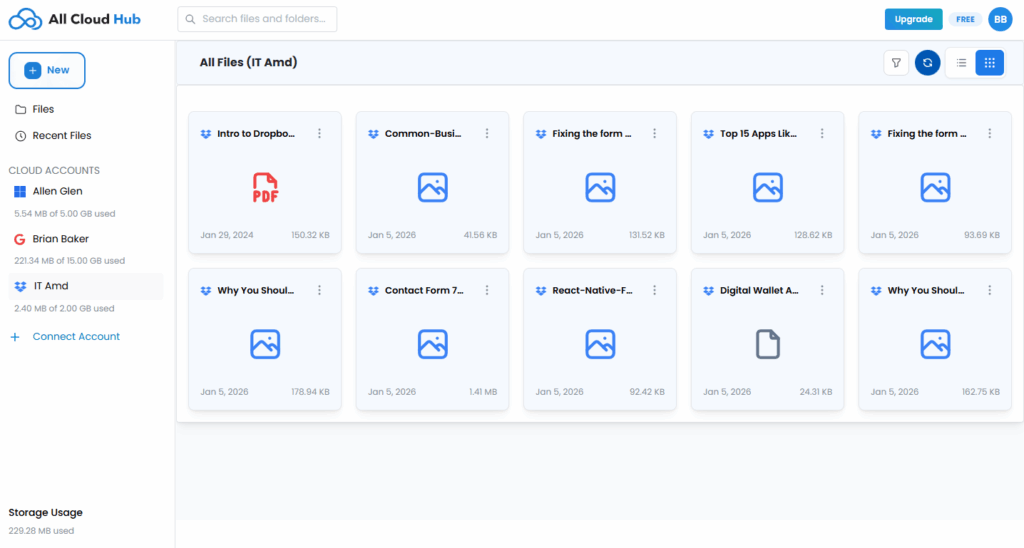
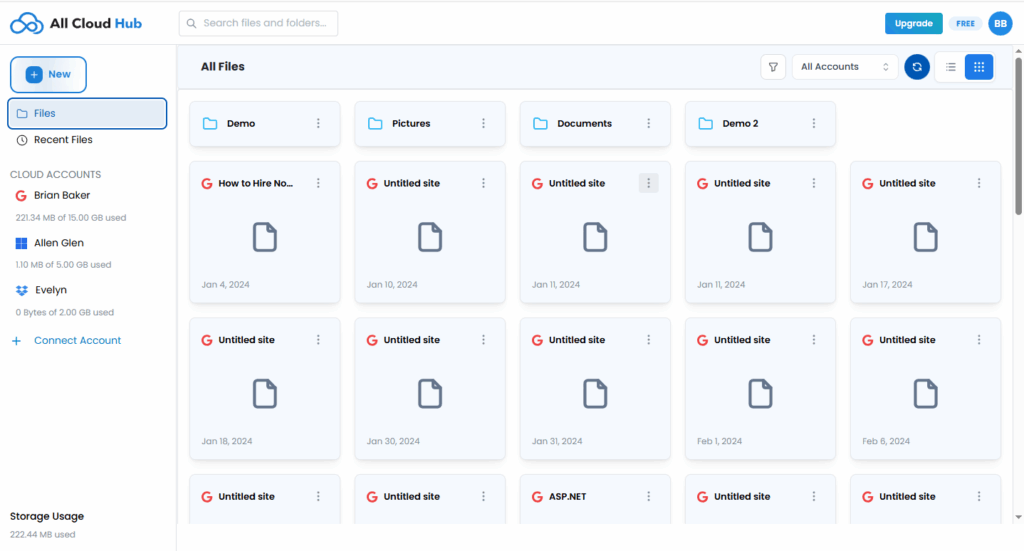
The All Files View

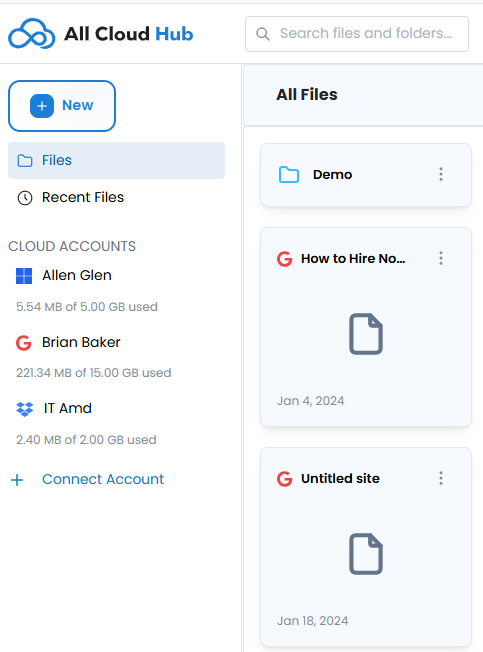
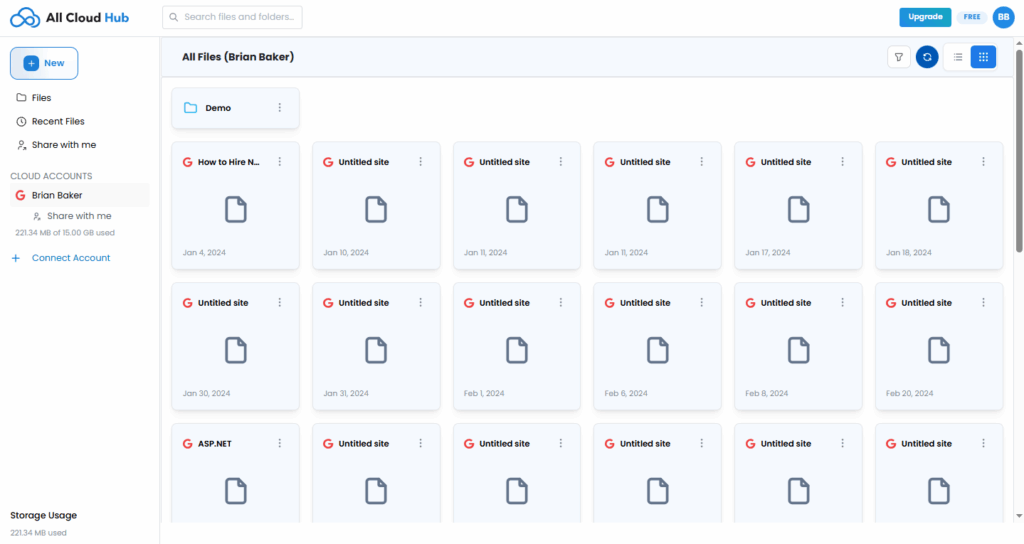
When you open FilesVerse, the default view is All Files.

In this view, files and folders from all connected cloud storage accounts appear together in a single workspace. Items are shown in a grid-style layout, making it easy to browse folders and files visually.

Files are not merged or moved. They are only displayed together for easier access.

FilesVerse showing folders and files from multiple cloud accounts together

Note

Seeing files together in FilesVerse does not change where they are stored. Each file continues to live in its original cloud storage account.

Identifying Files from Different Cloud Accounts

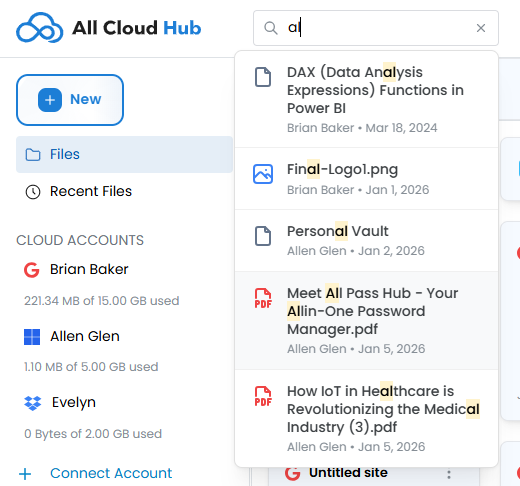
FilesVerse shows visual indicators that help you understand where files come from.

From the screenshot, files and folders display cloud-specific icons, such as a Google Drive indicator on files that belong to a Google account. This helps you recognize the source cloud at a glance while browsing mixed content.

This ensures clarity even when files from different cloud accounts appear next to each other.

Using the Account Filter

At the top of the FilesVerse view, there is an All Accounts filter.

This filter allows you to control which cloud accounts are included in the current view. When All Accounts is selected, FilesVerse shows files from every connected cloud storage account. You can use this filter to narrow the view to a specific account when needed.

Account filter set to “All Accounts

Folders and Files in FilesVerse

Folders and files are displayed together in FilesVerse.

Folders appear as clickable items that let you navigate deeper into their structure. Files appear with type-specific icons, such as document or PDF icons, along with basic information like file name and date.

You can interact with both files and folders directly from this view.

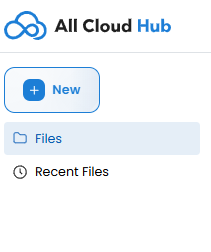
Switching Between Files and Recent Files

The left navigation includes options such as Files and Recent Files.

  • Files shows the full file and folder structure from connected cloud accounts
  • Recent Files highlights files that were accessed or updated recently

This helps you move quickly between browsing everything and focusing on recently used items.
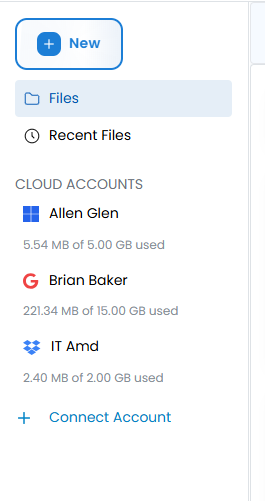
Left navigation showing Files and Recent Files

Storage Information

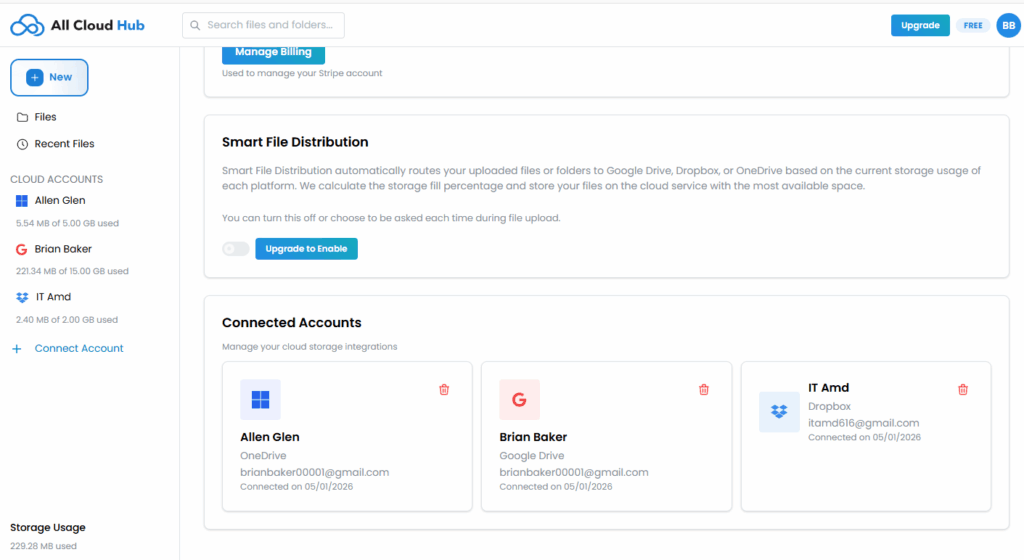
The left panel also shows storage usage information for connected cloud accounts.

This gives visibility into how much storage is used within each connected account, without needing to open the individual cloud service.

What This View Does Not Do

The unified view in FilesVerse does not:

  • Move files between cloud accounts automatically
  • Combine storage across cloud providers
  • Change file ownership or permissions

It is a viewing and management layer that sits on top of your existing cloud storage accounts.

In Summary

FilesVerse lets you see files and folders from multiple cloud storage accounts together in one place.

You can browse, identify, and work with files across clouds while always knowing where each file belongs. This makes it easier to manage files spread across different services without switching tools.

Next:

Searching Files Across All Connected Drives: How to find files quickly using FilesVerse Search.

Navigating the All Cloud Hub Dashboard

When you sign in to All Cloud Hub, you land directly on the Files view inside FilesVerse.

This screen acts as the main working area of the product. From here, you can browse files, access recent items, view connected cloud accounts, and start managing your files across clouds.

Overall Layout

The dashboard is divided into three clear areas:

  • A left sidebar for navigation and cloud account access
  • A top bar for search and view controls
  • The main content area where files and folders are displayed

This layout stays consistent as you move through the product.

Full dashboard highlighting sidebar, top bar, and main file area

Left Sidebar Navigation

The left sidebar helps you move between key sections without leaving your context.

From the screenshot, the sidebar includes:

  • Files This is the primary view where all files and folders are shown.
  • Recent Files This view helps you quickly access files that were opened or updated recently.

Below this, you will see the Cloud Accounts section.

Cloud Accounts Section

The Cloud Accounts section lists all connected cloud storage accounts.

Each connected account appears with:

  • The account name
  • The cloud provider indicator
  • Storage usage information

You can add a new cloud storage account using Connect Account, which is visible at the bottom of this section.

Cloud Accounts section showing connected accounts and Connect Account

Note

Cloud Accounts are always visible from the dashboard. You do not need to navigate away from FilesVerse to see which accounts are connected.

Top Bar and Search

At the top of the dashboard, there is a search bar labeled “Search files and folders”.

This search is available from the Files view and allows you to look for files and folders across your connected cloud storage accounts.

To the right of the search bar, there are view and filter controls that affect how files are displayed in the main area.

Top bar showing search field and view controls

Main File Area

The main content area displays files and folders from your connected cloud accounts.

By default:

  • The heading shows All Files
  • Items are displayed in a grid-style layout
  • Folders and files appear together
  • Each item includes a visual indicator of its source cloud

You can click into folders to navigate deeper into their structure.

View Controls

The dashboard includes controls that let you adjust how files are displayed.

From the screenshot, users can:

  • Switch between different view layouts
  • Filter files by connected accounts using the All Accounts dropdown

These controls help narrow or broaden what you see without changing where files are stored.

Staying Oriented

The dashboard is designed so that:

  • FilesVerse is always the main working view
  • Cloud account information is always visible
  • Search is always accessible
  • Navigation does not interrupt file browsing

This makes it easy to explore and manage files without losing track of where you are.

In Summary

The All Cloud Hub dashboard brings together navigation, cloud accounts, and files into a single, consistent workspace.

FilesVerse is where you spend most of your time, with connected cloud accounts and search always within reach. The layout helps you move confidently between files, recent activity, and cloud accounts without switching tools.

Next:

Viewing Files from Multiple Clouds in One Place. How FilesVerse shows files from different cloud storage accounts together while keeping them clearly identifiable.

How to Disconnect a Cloud Account Safely

Disconnecting a cloud account from All Cloud Hub removes it from FilesVerse, but it does not affect your actual files.

This guide explains how to disconnect an account, what happens immediately, and what does not happen when you do so.

Where to Disconnect a Cloud Account

Cloud accounts are managed from the Cloud Accounts section in the All Cloud Hub dashboard.

Each connected account appears in the list along with its provider icon and account alias. A Delete or disconnect option is available for each account.

Cloud Accounts list showing the Delete option for a connected account

Disconnecting an Account

To disconnect a cloud account:

  1. Go to the Cloud Accounts section
  2. Locate the account you want to disconnect
  3. Click the Delete option
  4. Confirm the action in the confirmation dialog

A confirmation message is shown before the account is disconnected.

Confirmation dialog shown before disconnecting a cloud account

Warning

Disconnecting an account removes it immediately from All Cloud Hub. Make sure you no longer need access to its files in FilesVerse before confirming.

What Happens After You Disconnect

Once the account is disconnected:

  • Files from that account disappear immediately from FilesVerse
  • All Cloud Hub loses access to the cloud account
  • Transfers or actions related to that account stop

This happens right away after confirmation.

What Does Not Happen

Disconnecting a cloud account does not:

  • Delete any files from the cloud provider
  • Modify files or folders in the cloud account
  • Affect other connected cloud accounts

Your files remain exactly as they were in Google Drive, OneDrive, or Dropbox.

Note

Disconnecting an account only affects visibility and access inside All Cloud Hub. It does not change anything inside the cloud storage service itself.

Reconnecting an Account Later

You can reconnect the same cloud account at any time.

To reconnect:

  • Click Connect Account
  • Add an account alias
  • Select the cloud provider
  • Complete the authorization flow again

There is no limit on how many times an account can be connected or disconnected, as long as you stay within your plan’s total account limit.

If Something Goes Wrong

If an account was disconnected accidentally, simply reconnect it using Connect Account.

If a connection attempt fails:

  • The account is not added
  • An error message is shown
  • You can retry the process immediately

In Summary

Disconnecting a cloud account from All Cloud Hub is safe and reversible.

Files disappear from FilesVerse, but they remain untouched in the cloud provider. Other connected accounts continue to work as expected, and you can reconnect the same account whenever you need.

What Permissions All Cloud Hub Requests (& Why)

When you connect a cloud storage account to All Cloud Hub, you are asked to grant certain permissions.

This page explains what permissions are requested, why they are needed, and what All Cloud Hub does and does not do with that access.

Why Permissions Are Required

All Cloud Hub is designed to let you work with your files directly from FilesVerse.

To do this, it needs permission to access your cloud storage account in ways that match the actions you choose to perform, such as viewing files, organizing folders, or transferring files between clouds.

Permissions are not used for background activity or automated changes.

Permissions All Cloud Hub Requests

When you connect a supported cloud storage account, All Cloud Hub requests permission to:

  • View file and folder metadata such as names, paths, and sizes
  • Read file contents so files can be displayed and transferred
  • Create new files and folders when you copy or transfer items
  • Modify existing files and folders when you rename or organize them
  • Delete files only when you explicitly move or delete them

These permissions allow All Cloud Hub to act on your behalf only when you initiate an action.

Note

All Cloud Hub does not perform any file action unless you explicitly request it inside the dashboard.

Provider Permission Screens

Each cloud provider shows its own permission screen during connection.

  • Google Drive, OneDrive, and Dropbox use different wording
  • The intent of the permissions is the same across providers
  • Any visible differences are cosmetic rather than functional

All Cloud Hub documents the connection flow once because the user experience is effectively the same.

What All Cloud Hub Does Not Do

Even with permissions granted, All Cloud Hub does not:

  • Access your files in the background without user action
  • Make automated changes to your files
  • Read or modify files you do not interact with
  • Use your data for any purpose outside file management

All file actions are user-initiated and visible to you.

Permissions and File Actions

Permissions enable specific actions you choose, including:

  • Renaming files and folders
  • Moving or copying files within a cloud account
  • Transferring files between different cloud storage accounts
  • Syncing folders across clouds

If you never perform these actions, All Cloud Hub does not perform them for you.

Revoking Permissions

You can revoke permissions at any time by disconnecting a cloud account from All Cloud Hub.

When a cloud account is disconnected:

  • All Cloud Hub immediately loses access to that account
  • Files from that account disappear from FilesVerse
  • No files are deleted or modified in the cloud provider

You can reconnect the same account later if needed.

Tip

If you are ever unsure about access, disconnecting and reconnecting an account is a safe way to reset permissions.

In Summary

All Cloud Hub requests permissions only to support actions you explicitly choose to perform.

Files remain stored in your cloud storage accounts at all times. All Cloud Hub does not access files in the background, make automated changes, or store file contents.

Permissions exist to give you control, not to take it away.

Next:

How to Disconnect a Cloud Account Safely.

How to Connect Dropbox to All Cloud Hub

This guide explains how to connect a Dropbox account to All Cloud Hub.

Once connected, files and folders from your Dropbox account begin appearing inside FilesVerse, where you can manage them alongside files from other connected cloud storage accounts.

Before You Start

Before connecting Dropbox, make sure:

  • You have a Dropbox account
  • You are signed in to All Cloud Hub
  • You are within your plan’s account limit
    • Free plan allows up to three connected cloud accounts
    • Power User plan allows unlimited connected accounts

Step 1: Open the Connect Account Screen

From the All Cloud Hub dashboard, go to the Cloud Accounts section.

Click Connect Account to open the cloud selection screen.

Connect Account screen showing Google Drive, OneDrive, and Dropbox options

Step 2: Add an Account Alias

To connect Dropbox, you must first enter an Account Alias.

The Account Alias is a nickname that helps you identify this Dropbox account inside All Cloud Hub. This is useful if you connect more than one Dropbox account.

Examples include:

  • Personal Dropbox
  • Client Dropbox
  • Team Dropbox

After entering the alias, select Dropbox as the cloud platform.

The Connect Account button becomes active once both fields are filled.

Account Alias field with Dropbox selected


Tip

Choose an alias that clearly describes how you use this Dropbox account. The alias appears throughout FilesVerse and Cloud Accounts.

Step 3: Sign In to Dropbox

Click Connect Account.

You are redirected to the Dropbox sign-in page. Sign in using the Dropbox account you want to connect.

If you are already signed in to multiple Dropbox accounts, Dropbox will ask you to choose the account to authorize.

Dropbox sign in and authorization screen

Step 4: Grant Permissions

Dropbox will ask you to grant permissions so All Cloud Hub can work with your files.

These permissions allow All Cloud Hub to access required file information and perform actions you choose, similar to other supported cloud providers. They are required so you can:

  • View files and folders
  • Rename and organize files
  • Copy or move files
  • Transfer files between cloud storage accounts
  • Sync folders across clouds

All actions are performed only when you initiate them inside All Cloud Hub.

Note

All Cloud Hub does not access files in the background or make changes without your action. File metadata is handled securely and removed automatically once tasks are completed or the account is disconnected.

Step 5: Return to FilesVerse

After approving the permissions, you are redirected back to FilesVerse.

There is no success message. Your Dropbox account is connected automatically, and its files and folders begin appearing in the dashboard.

The connected Dropbox account is listed under Cloud Accounts, identified by:

  • The Dropbox icon
  • The Account Alias you provided
FilesVerse showing files from a newly connected Dropbox account

What Happens Next

Once connected, you can immediately:

  • View Dropbox files alongside files from other cloud accounts
  • Search Dropbox files using FilesVerse search
  • Rename and organize files directly from the dashboard
  • Transfer files between Dropbox and other connected clouds

All files remain stored in your Dropbox account. All Cloud Hub temporarily handles only the required file metadata to display details and perform actions, and does not store file contents.

If the Connection Fails

If the browser is closed during sign-in, or if permission is denied, the connection is not established.

In this case:

  • The Dropbox account is not added
  • You can retry the connection using Connect Account

An error message is shown if the connection fails.

In Summary

Connecting Dropbox to All Cloud Hub requires adding an account alias, selecting Dropbox, and approving access through Dropbox.

Once connected, your Dropbox files appear in FilesVerse automatically and can be managed alongside your other cloud storage accounts.

Next:

What Permissions All Cloud Hub Requests (and Why).

How to Connect OneDrive

This guide explains how to connect a OneDrive account to All Cloud Hub.

After connecting OneDrive, its files and folders begin appearing inside FilesVerse, where you can work with them alongside files from other connected cloud storage accounts.

Before You Start

Before connecting OneDrive, make sure:

  • You have a Microsoft account with access to OneDrive
  • You are signed in to All Cloud Hub
  • You are within your plan’s account limit
    • Free plan allows up to three connected cloud accounts
    • Power User plan allows unlimited connected accounts

Step 1: Open the Connect Account Screen

From the All Cloud Hub dashboard, locate the Cloud Accounts section.

Click Connect Account to open the cloud selection screen.

Connect Account screen showing Google Drive, OneDrive, and Dropbox options

Step 2: Add an Account Alias

To connect OneDrive, you must first enter an Account Alias.

The Account Alias is a short name that helps you identify this OneDrive account inside All Cloud Hub. This is useful if you plan to connect more than one OneDrive account.

Examples include:

  • Personal OneDrive
  • Work OneDrive
  • Client OneDrive

After entering the alias, select OneDrive as the cloud platform.

The Connect Account button becomes active once both fields are filled.

Account Alias field with OneDrive selected

Tip

Choose an alias that clearly reflects how you use this OneDrive account. The alias appears throughout FilesVerse and Cloud Accounts.

Step 3: Sign In to OneDrive

Click Connect Account.

You are redirected to the Microsoft sign-in page. Sign in using the Microsoft account associated with the OneDrive account you want to connect.

If you have access to multiple Microsoft accounts, you will be prompted to choose one.

Microsoft sign-in and account selection screen

Step 4: Grant Permissions

Microsoft will ask you to grant permissions so All Cloud Hub can work with your OneDrive files.

These permissions allow you to:

  • View files and folders
  • Create, rename, and organize files
  • Copy or move files
  • Transfer files between cloud storage accounts
  • Sync folders across clouds

All Cloud Hub uses these permissions only when you perform actions inside the dashboard.

Note

All Cloud Hub does not make changes to your OneDrive files unless you explicitly initiate an action.

Step 5: Return to FilesVerse

After approving the permissions, you are redirected back to FilesVerse.

There is no confirmation message. Your OneDrive account is connected automatically, and its files and folders start appearing in the dashboard.

The connected OneDrive account is listed under Cloud Accounts, identified by:

  • The OneDrive icon
  • The Account Alias you provided
FilesVerse showing files from a newly connected OneDrive account

What Happens Next

Once connected, you can immediately:

  • View OneDrive files alongside files from other cloud accounts
  • Search OneDrive files using FilesVerse search
  • Rename and organize files directly from the dashboard
  • Transfer files between OneDrive and other connected clouds

All files remain stored in your OneDrive account.

If the Connection Fails

If the browser is closed during sign-in, or if permissions are denied, the connection is not completed.

In such cases:

  • The OneDrive account is not added
  • You can retry the process using Connect Account

An error message is shown when the connection fails.

In Summary

Connecting OneDrive to All Cloud Hub involves adding an account alias, selecting OneDrive, and approving access through Microsoft.

Once connected, your OneDrive files appear in FilesVerse automatically and can be managed alongside your other cloud storage accounts.

Next:

How to Connect Dropbox to All Cloud Hub.

How to Connect Google Drive

This guide walks you through how to connect a Google Drive account to All Cloud Hub.

Once connected, files and folders from your Google Drive will start appearing inside FilesVerse, where you can view, search, organize, transfer, and sync them alongside other connected cloud accounts.

Before You Start

To connect Google Drive, make sure:

  • You have a Google account with access to Google Drive
  • You are signed in to All Cloud Hub
  • You have not exceeded your plan’s account limit
    • Free plan allows up to three connected cloud accounts
    • Power User plan allows unlimited connected accounts

Step 1: Open the Connect Account Screen

From the All Cloud Hub dashboard, go to the Cloud Accounts section.

Click Connect Account.

This opens the screen where you can choose which cloud storage service to connect.

Connect Account screen showing Google Drive, OneDrive, and Dropbox options.

Step 2: Add an Account Alias

Before connecting Google Drive, you are required to add an Account Alias.

The Account Alias is a nickname that helps you identify this account inside All Cloud Hub. This is especially useful if you connect multiple Google Drive accounts.

For example, you might use:

  • Personal Google Drive
  • Client Drive
  • Work Google Drive

After entering an alias, select Google Drive as the cloud platform.

The Connect Account button becomes active once both fields are filled.

Account Alias field with Google Drive selected

Tip

Choose a clear and descriptive alias. This name will appear wherever this account is referenced inside FilesVerse.

Step 3: Sign In to Google

Click Connect Account.

You are redirected to the Google sign-in screen. From there, sign in using the Google account you want to connect.

If you are already signed in to multiple Google accounts, Google will ask you to choose which account to use.

Google sign-in and account selection screen

Step 4: Grant Permissions

Google will ask you to grant permissions so All Cloud Hub can work with your files.

These permissions are required so you can:

  • View files and folders
  • Rename and organize files
  • Copy or move files
  • Transfer files between cloud storage accounts
  • Sync folders across clouds

All actions are performed only when you initiate them inside All Cloud Hub.


Note

All Cloud Hub does not access your files in the background or make changes without your action.


Step 5: Return to FilesVerse

After you approve the permissions, you are redirected back to FilesVerse.

There is no success message. Instead, your Google Drive account is connected automatically, and its files and folders begin appearing in the dashboard.

Your connected Google Drive will now be listed under Cloud Accounts, identified by:

  • The Google Drive icon
  • The Account Alias you provided
FilesVerse showing files from a newly connected Google Drive account

What Happens Next

Once connected, you can immediately:

  • View Google Drive files alongside files from other cloud accounts
  • Search Google Drive files using FilesVerse search
  • Rename and organize files directly from the dashboard
  • Transfer files between Google Drive and other connected clouds

All files remain stored in your Google Drive account.

If the Connection Fails

If the browser is closed during sign-in, or if permission is denied, the connection is not established.

In this case:

  • No account is added
  • You can repeat the connection process from Connect Account

An error message is shown if the connection fails.

In Summary

Connecting Google Drive to All Cloud Hub requires adding an account alias, selecting Google Drive, and approving access through Google.

Once connected, your Google Drive files appear in FilesVerse automatically, ready to be managed alongside your other cloud storage accounts.

Next:

How to Connect OneDrive to All Cloud Hub.

System Requirements and Supported Cloud Services

This page explains what you need to use All Cloud Hub and which cloud storage services are currently supported.

If you are unsure whether your setup will work, this section should help clarify things.

Accessing All Cloud Hub

All Cloud Hub is currently available as a web application.

You can access it from any modern web browser. There are no specific browser restrictions, and no local software installation is required.

A mobile app is planned for the future.

Note

Because All Cloud Hub runs in the browser, you can access your files from any device without setting up local sync software.

Supported Cloud Storage Services

All Cloud Hub currently supports the following cloud storage providers:

  • Google Drive
  • Dropbox
  • OneDrive

You can connect personal as well as business or workspace accounts for these services.

Additional cloud storage providers are planned, including pCloud, MEGA, and Proton Drive.

Cloud Accounts section showing supported cloud services

Connecting Cloud Accounts

To use All Cloud Hub, you must connect at least one cloud storage account.

Cloud accounts are connected securely using OAuth. This allows you to sign in directly with the cloud provider and grant permission without sharing your password.

Write access is required so that All Cloud Hub can rename, organize, transfer, and sync files on your behalf.

Connected accounts are listed under Cloud Accounts, and new accounts can be added using Connect Account.

Connect Account flow showing cloud provider selection

Account Types Supported

All Cloud Hub supports:

  • Personal cloud storage accounts
  • Business and workspace cloud storage accounts

You can connect multiple accounts from the same provider or different providers, depending on your plan.

Plans and Limits

All Cloud Hub does not impose artificial limits on transfer bandwidth.

Transfers happen directly between your browser and the connected cloud services, without being permanently stored or throttled by All Cloud Hub servers.

Plan limits are based on the number of cloud storage accounts you can connect:

  • Free plan allows up to three connected cloud accounts
  • Power User plan allows unlimited connected cloud accounts

There are no limits based on file size imposed by All Cloud Hub itself.

Tip

If you work across multiple clients or projects, connecting all your cloud accounts early makes FilesVerse more effective from day one.

Permissions and Security

All Cloud Hub only accesses the permissions required to provide its features.

Files remain stored in their original cloud storage accounts at all times. All Cloud Hub does not store file contents. Only the minimum required file metadata is handled temporarily over a secure connection to display details and perform operations. Files are not downloaded unless you explicitly choose to.

You can disconnect any cloud account at any time. Once disconnected, All Cloud Hub immediately loses access to that account and its files.

Temporary metadata is automatically cleared once the related task is completed or the account is disconnected.

What You Need to Get Started

To start using All Cloud Hub, you need:

  • A supported web browser
  • At least one supported cloud storage account
  • Permission to authorize access to that account

Once connected, FilesVerse becomes your central workspace for managing files across all your cloud storage services.

In Summary

All Cloud Hub works with the cloud services you already use.

As long as you have a supported browser and at least one supported cloud storage account, you can start viewing, searching, organizing, transferring, and syncing files from one unified dashboard.

All Cloud Hub Terminology Explained

This page explains the common terms you will see while using All Cloud Hub.

If you are ever unsure what something means inside the dashboard, this is a good place to start.

FilesVerse

FilesVerse is the main dashboard in All Cloud Hub.

It is a unified workspace where files and folders from all your connected cloud storage accounts are displayed together. From FilesVerse, you can browse, search, organize, transfer, and sync files without opening individual cloud apps.

FilesVerse does not store your actual files. It shows and manages files that live in your connected cloud accounts by securely retrieving and handling the required file metadata.

FilesVerse dashboard highlighting files from multiple cloud accounts

Note

Seeing all files together does not combine your cloud accounts. Each file still belongs to its original cloud storage service.

Cloud Account

A Cloud Account is a cloud storage account you connect to All Cloud Hub.

Examples include Google Drive, Dropbox, and OneDrive. Once connected, the account appears under the Cloud Accounts section.

You can connect or disconnect cloud accounts at any time.

Cloud Accounts section showing connected accounts and the “Connect Account” option

Drive

In All Cloud Hub, a Drive refers to a connected cloud storage account.

For example, your Google Drive or Dropbox account is treated as a separate drive inside FilesVerse. This helps distinguish where files come from, even when they are displayed together.

FilesVerse Search

FilesVerse Search allows you to search across all connected cloud drives at once.

Instead of searching separately inside each cloud service, you can search once and see results from all connected accounts in a single list. Actions like rename, move, copy, or transfer can be performed directly from the search results.

FilesVerse Search showing results from multiple cloud drives

Transfer

A Transfer is the action of copying or moving files or folders from one cloud drive to another.

When you start a transfer, files move directly between the cloud services. They do not pass through All Cloud Hub servers for permanent storage. Required file metadata and transfer state are handled temporarily over a secure connection unless you choose to download the files.

You can choose between copying a file or moving it fully to another cloud drive.

Warning

Moving a file removes it from the source cloud drive. Use Copy if you want to keep the file in both locations.

Source Drive

The Source Drive is the cloud drive where a file or folder currently exists.

This is the starting point for transfers, moves, and sync operations.

Destination Drive

The Destination Drive is the cloud drive where files or folders are copied or moved to.

During transfers, you always select a destination drive so All Cloud Hub knows where the files should go.

Sync

Sync keeps folders aligned across different cloud storage accounts.

All Cloud Hub supports real-time, two-way syncing. When a change is made in one synced folder, the same change is reflected in the connected folder on the other cloud drive.

Sync helps ensure folders stay consistent without manual updates.

Logs

Logs show information about file actions and transfers performed through All Cloud Hub. These are generated from operational metadata and task status, not file contents.

Logs help you understand what actions were taken and whether they were completed successfully. They are useful for tracking activity and troubleshooting issues.

Metadata

Metadata refers to basic information about files, such as file name, path, and size.

All Cloud Hub uses metadata to display file details, power search, and manage operations inside FilesVerse. This metadata is handled temporarily over a secure connection and is removed once the related task is completed.

The actual file contents always remain in your cloud storage accounts.

Across the platform, All Cloud Hub minimizes data handling to only what is required for visibility, control, and reliability.

In Summary

All Cloud Hub terminology is designed to reflect how you already think about your cloud storage.

FilesVerse is where everything comes together. Drives represent your connected cloud accounts. Transfers, sync, and search help you work across them without switching tools.

Next:

System Requirements and Supported Cloud Services: What you need to use All Cloud Hub and which cloud providers are currently supported.

How All Cloud Hub Works

All Cloud Hub is designed to work with your existing cloud storage accounts, not replace them.

Instead of moving your files into a new system, All Cloud Hub connects to the cloud services you already use and brings them together into a single working view called FilesVerse.

This section explains what happens behind the scenes when you connect cloud accounts and start working with your files.

Step 1: Connecting Your Cloud Storage Accounts

To get started, you connect one or more cloud storage accounts to All Cloud Hub.

All Cloud Hub currently supports Google Drive, Dropbox, and OneDrive. Connecting an account is done securely using OAuth. This means you sign in directly with the cloud provider and grant permission without sharing your password.

Write access is required so that you can rename, organize, transfer, and sync files directly from the All Cloud Hub dashboard.

Once connected, the account appears under Cloud Accounts.

Cloud Accounts section showing connected accounts and the “Connect Account” option

Note

Connecting a cloud account does not move or copy any files. It only allows All Cloud Hub to work with files that already exist in your cloud storage.

Step 2: Viewing All Files in FilesVerse

After connecting your cloud accounts, FilesVerse becomes your main workspace.

FilesVerse shows files and folders from all connected cloud storage accounts together in one unified dashboard. Files remain stored in their original cloud locations, while FilesVerse securely retrieves the required file metadata to let you work with them from a single view.

You do not need to switch between cloud apps to browse or organize your files. FilesVerse brings everything into one place while keeping ownership and storage unchanged.

FilesVerse dashboard showing files from multiple cloud accounts together

Tip

Seeing files from multiple cloud accounts together does not merge them. Each file still belongs to its original cloud storage service.

Step 3: Searching Across Cloud Drives

FilesVerse includes a unified search that works across all connected cloud accounts.

When you search for a file or folder, All Cloud Hub looks across every connected drive at once and shows the results in a single list. You no longer need to repeat the same search in different cloud services.

Search results can be acted on directly. You can rename, move, copy, or transfer files straight from FilesVerse.

FilesVerse search showing results from multiple cloud storage accounts

Step 4: Organizing and Managing Files

All Cloud Hub allows you to manage files directly from the dashboard.

You can rename files and folders, move them within a cloud drive, or copy and move them between different cloud storage services. These actions use the permissions you granted when connecting your accounts.

All changes happen directly in your cloud storage accounts. All Cloud Hub does not create local copies or store your actual files on its own servers. Only the required file metadata is handled temporarily to perform these actions.

Warning

Moving a file removes it from the source cloud drive. Use Copy if you want to keep the original file in both locations.

Step 5: Transferring Files Between Cloud Services

When you transfer files using All Cloud Hub, the transfer happens directly between your browser and the connected cloud services.

Files are transferred securely without being permanently stored by All Cloud Hub. Required file metadata and transfer state are handled temporarily over a secure connection and removed once the task is completed.

You can choose whether to copy files or move them. Copying creates a new copy in the destination cloud while keeping the original file. Moving transfers the file fully to the destination cloud.

Transfers happen in real time. If multiple transfers are started, they are queued so nothing is lost.

Tip

Because transfers are direct and do not rely on All Cloud Hub servers, there are no artificial bandwidth limits imposed by All Cloud Hub.

Step 6: Keeping Folders in Sync

All Cloud Hub supports real-time, two-way folder syncing.

When sync is enabled between folders in different cloud storage accounts, changes made in one location are reflected in the other. This helps keep shared or mirrored folders aligned across clouds without manual effort.

Sync works alongside FilesVerse, so you can monitor and manage synced folders from the same dashboard where you manage all other files.

Step 7: Visibility and Logs

All Cloud Hub provides visibility into file actions and transfers. Logs are based on operational metadata and task status, not file contents.

You can view logs related to transfers and operations to understand what actions were performed and their status. This helps you track activity and troubleshoot issues when needed.

How All Cloud Hub Handles Your Data

All Cloud Hub only accesses the metadata required to provide its features, such as file names, paths, and sizes.

Your actual files remain in your cloud storage accounts at all times. All Cloud Hub does not store or process file contents. Temporary metadata and session data used during active tasks is cleared automatically once the task is completed or the account is disconnected.

All Cloud Hub is designed to minimize data handling to only what is required for functionality, visibility, and reliability.

In Summary

All Cloud Hub works by connecting your existing cloud storage accounts, bringing their files into a unified dashboard, and allowing you to work across them from one place.

FilesVerse becomes your central workspace, while your files stay exactly where they belong.

Next:

All Cloud Hub Terminology Explained: A quick guide to the terms you will see across the dashboard and documentation.